woodies

woodies

Monday, May 25, 2009

Print and fabric doll tutorial..


What you will need..Computer...computer paper...printer...image...sewing machine...calico...sewing needle...cotton and thread...organza ribbon...beads...sequins...fabric flowers..color pencils... hot glue gun and glue.

I use photshop cs to design my dolls,but if you don't have photshop or are not to familar with it,you can do it by saving images from the net,there are lots of free vintage image sites on the net for you to down load from,just type in free vintage images into your search engine and see where it takes you.

You could scan an image into your pc to use if you wanted to do it that way.

Be sure to wash and iron your calico to remove the glue sizing!

Print out your design onto paper first,so that you will have a guide line for taping your calico.
Make sure that you leave definite caps to the top,bottom and sides of your image to allow for placement of the sticky tape,remember if you dont do this the tape will take the ink and not your fabric!


Sticky tape the calico to your printed paper,make sure there is a good gap between your sticky tape and the image area,you don't want the tape to overlap your image and leave a straight blank line on the image.
Also make sure you sticky tape all sides of the calico as it may pull free in the printer and that is no fun!

Print out the image onto your calico!

Draw a sewing line and a trimming line around your doll on the back side of the image ,if your have trouble seeing your image to draw lines,hold it against a window or your computer screen,you should get a good image of her to draw around by doing this.

Once you have drawn your lines around the back of the image put the image face down against your other piece of calico and sew around the sewing line and dont forget to leave an opening of about one inch for turning,next trim the edges of your doll using the trimming line.

Turn your your doll, stuff her with fiber fill and sew the opening up using ladder stitch.

I like to take some color pencils and color in her cheeks,lips and eyelids to make her look even prettier,I use Faber Castelle color pencils but Im sure other people use any brand of pencils.
You could try using pastels,watercolor pencils,ink,acrylic or even real make up,its all worth trying!

Now your doll is ready to embellish,I sewed organza ribbon to her base to make her look floaty and whimsical,I sewed sequins and beads to add sparkle and hot glued fabric flowers to make her kind of romantic.
I recommend that you first pin embellishments on to get a feel for what you want to do,just take the pins out when you are ready to glue.
I left the pins in until I was ready to glue and then took only the one out that I wanted to glue then move to the next one,so unpin one at a time!

Your doll is now finished and looking just wonderful,sit her on your bed or shelf to show her off!
You can make her a few friends to display and keep her company,its fun and rewarding,so give it a go!

Thursday, May 14, 2009

How to photograph and edit your doll for the web.


Hi you all,I have added this little tutorial to help my fellow doll makers show their dolls off in the best possible way,so here we go...

What you will need...Computer..photoshop...digital camera...doll...props such as flowers,pretty scrap book papers and what ever suits you or takes your fancy.

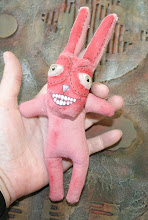
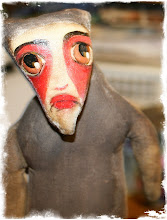
First...set up your doll and pretty things,I put some pretty paper for the back ground,white computer paper for the bottom,flowers for under the Tadmer,string to hang her from so she seems to be floating,then I start to take photos from different angles,I only used a couple but its best to take a few,you can always delete what you don't need.

Second...once you are happy with the shots,take them to your computer and down load then to the pc,pick the one you want to work with and head over to the photoshop to play!

Third...open photoshop,open your photo file and pick the image that you want to tweek....
When you have your image there crop it to get rid of parts that dont need to be there.

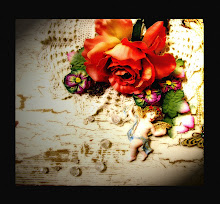
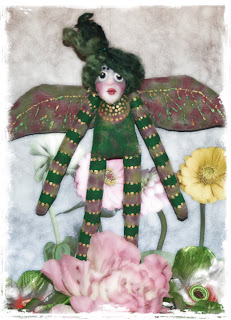
Forth..I used some vine brushes to add a nice whimsical feel to the pic,I also blured the edges of the photo by using two layers.
I went to Layers...duplicate layer..named it tadmer...and then disabled the original layer so I could work on the duplicate..I then went to the erraser tool and picked some long edgey brushes and softened the outer edges of the photo,then I went to Layers..flatten image.

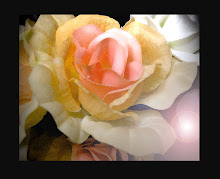
Next I went to Filters..Distort..disfuse glow and tweeked it until I was happy with the softness of the image.

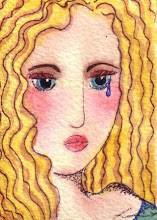
I then added some text to give a brief hint as to who and what Tadmer was, your will see some photos under this post showing the stages of the doll photo set up and edit.

If you need brushes to down load onto you pc in photoshop just browse the net for free brushes or pop in and join Deviant art and you will find a heap there but ask the makers if you can use then,though are heaps to use for free any way in the resources section at DA,in fact you will find a great many resourses for your on line art over at DA and lots of tutorials to use!

Well I hope this has helped or at least inspired you to make pretty pics of your dolls,I will be starting tutorial blog in the next week or so so pop in for the link.

Hugs to you all!
Set up your doll with some props and click away until you have the shot you want.
Take the image to photoshop and crop to the size you like.
Add brushes and diffuse glow.
add text.

Thursday, May 7, 2009

New dolls and fabric's!!!!!!!!!!!!!!!!!!!!!


Well its been a wonderful couple of weeks,Ive joined Art Dolls Only and Nancyes Art Doll,and the encouragement and warmth of the doll makers has been awesome,I encourage any doll maker to join them,you wont look back,these women are so inspiring!

I have been working on Bunny Blue,I decided to go back to the way I made dolls when I made my first ever dolls,I just sew up a doll in calico and paint it with acrylic paint,when its done I will put coat or two of matt varnish for its protection and viola a new doll!

I also found some great fabrics at the local craft store,they will be great for clothing on the dolls and for back ground props,love the glittery type of fabrics for the back grounds.

Thought I would share a tips here about presenting your dolls,I take a few pics of my doll with back ground props of contrasting fabrics and glittery flower and odds and ends and then I click away until I'm happy,them I take it to Photoshop and tweak it with distort-disfuse glow untill it is soft,then I crop it,use some brushes to soften the edges,then its ready to be veiwed.

I keep a large number of phot props handy and make a good deal of them,I purchase bonches of fake flowers,pull them apart,glitter the edges,join them back to gether with button,paper clips, whatever is handy,alo9s make boxes of different styles,jewelery,boahs,feathers,paintings,lace,anything pretty,funky and fun!

Tool of the week is my stylus,its great for dotting patterns on my dolls.